Thursday, February 28, 2013

Candied Citrus Scones


I’m swamped with editing wedding photos from my dear friend Kelli’s wedding (350 down.... only 100 to go!), but I still wanted to share these wonderful candied citrus scones.


When I lived in Charleston, one of my favorite downtown spots was a store on John Street called Macaron Boutique.  They had amazing macarons (of course), and breakfast pastries, like an almond pain au chocolat (!) and candied citrus scones.


I haven’t been up for trying to make my own laminated doughs at home here in TX yet (I simply don’t have the space in our overstuffed apartment freezer), but I do make scones quite often.


After making the citrus granita, I found myself with a good amount of citrus peel.  I couldn’t bear to simply throw it away.  Instead, I candied it.


Candied citrus is fabulous, all on it’s own, rolled in granulated sugar or even dipped in chocolate. But I decided at least part the citrus should go into a batch of scones & be reminiscent of my favorite Macaron Boutique candied citrus scones.


I candied just the rind of the lemon, the cara cara oranges, and the Minneola Tangelo knowing that the lime & the grapefruit flavors may be a bit too strong for the scones.


My stand-by scone recipe, which I’ve posted previously about with the Zucchini Scones  and the Bittersweet Chocolate & Cherry Scones, was easily adapted for the chopped candied zest addition and for my substitution of gluten free flour.


Usually, I’m a big fan of glazed scones (I do have an insatiable sweet tooth), but Macaron Boutique doesn’t glaze theirs.  They sprinkle the scones, prior to baking, with a coarse sanding sugar instead. The sugar melts slightly in the oven & forms a nice crunchy, slightly sweet crust.  I promise, you won’t even miss the glaze!


After the photoshoot & a few taste tests, these scones became interstate travelers. I packed them as a quick and easy breakfast option while I drove from TX to ND.  The were a welcome, much more gourmet item than anything I could have found at any of our gas station pit stops.


CANDIED CITRUS

Citrus Peel (I used 1 lemon, 2 cara cara oranges, and 1 Mineola Tangelo)
16 fl oz Water, plus additional for blanching
2c/14 oz Sugar
splash lemon juice

  1.  Cut the citrus peel (rind & pith) into long strips (or alternately, into small bits, but I prefer to chop the peel after it’s been candied).  
  2. Place the strips into a non-reactive, stainless steel sauce pan.  Cover with water.  Bring the pan to a boil over high heat & allow to boil briefly.  Drain off the water. 
  3. Re-cover with fresh water & repeat the boiling process until the peel has been blanched 3 times.  This three process blanching will remove most of the bitterness from the peel and pith.  If you leave the citrus pieces in very wide strips, you may want to blanch it a 4th time. 
  4. Return the blanched peel to the same sauce pan.  Add the sugar, water & splash of lemon juice.  Stir briefly to combine.  
  5. Bring to a boil, then reduce the heat to a simmer & allow the peel to simmer until tender and almost translucent, 60-80 minutes.  Do not stir.  Do not allow the sugar syrup to caramelize. 
  6. Remove from the heat & cool.  
  7. Store the candied citrus, in the liquid, in the refrigerator until ready to use.  

Note: any leftover candying liquid would be wonderful added to a cocktail!


CANDIED CITRUS SCONES

4 oz (1 stick) Butter, cold
2 c Flour (I used AP Gluten Free Mix)
1/4 c Sugar
1/2 tsp Baking Soda
2 tsp Baking Powder
1/2 tsp Salt
1 heaping cup Candied Citrus, chopped
2/3 c Buttermilk
Coarse Sanding Sugar, for garnish

  1. Using a box grater, grate the butter onto a plastic-wrap-lined plate.  Transfer the butter to the freezer for 10 to 15 minutes, or until the butter is hard.  
  2. Preheat the oven to 400 F.  Line to baking sheets with parchment paper. 
  3. In a large bowl, combine the flour, sugar, baking powder, baking soda, and salt.  
  4. Gently toss the frozen butter shards, by hand, with the dry ingredients, working quickly so that the heat of your hands does not melt the butter.  
  5. Add the chopped citrus peel & stir until just combined.  
  6. Add the buttermilk & mix quickly with your hands.  Work the dough only until the mixture comes together & there are not pockets of dry ingredients. 
  7. Divide the dough in half.  Shape the first half into a ball, then flatten into a disk.  Place the disk onto a lightly floured surface.  Use a bench cutter or knife to cut the disk into 8 triangles.  
  8. Place the triangles onto the parchment lined baking sheet.  Sprinkle with a little coarse sanding sugar.  
  9. Repeat the process with the second disk of dough.  
  10. Bake the scones for approximately 15 minutes, or until golden brown.  
  11. Cool slightly & serve. 
  12. Leftovers will keep for up to 3 days in an airtight container at room temperature.  To re-crisp leftover scones (or to reheat), place into a low temp oven until heated through.  Please don’t microwave :)  


Wednesday, February 20, 2013

Citrus Granita


I love how there are fruits for every season.  Spring & early summer belongs to the berries.  Stone fruit belongs to mid to late summer.  Apples & pears belong to the fall.  And citrus belongs to the winter.


I’ve never lived in a state where quite so much citrus is produced.  I’ve had a few gleeful moments when driving past citrus trees laden with fruit.  And it’s a cheerful sight to walk into the produce department of the grocery store & see giant bins filled with different citrus varieties.


Another delight with using in-season produce is the price.  I think we’ve nearly eaten our weight in Texas Grapefruit and the ever-popular “Cuties” this winter.....


It’s funny how there are some fruits that I consider to be “eating” fruits and some that I consider “cooking” or “baking” fruits.  And yes, there sometimes is overlap.  Often, I find that citrus fits into the “eating” category (or “drinking” category).    But in an effort to be a little more creative with our citrus intake, and as a throwback to one of my favorite breakfast beverages “Five Alive” I decided to make a granita.


Granitas are super easy to make.  They consist of a sweetened liquid (juice, fruit puree, coffee, etc.) that is “still frozen,” meaning it does not go through an ice cream machine.  The mixture is scraped with a fork to make ice crystals.  And voila, you have granita!


Some people scrape & flake the mixture with a fork during the freezing process.  Some people scrape after the entire thing is frozen solid.  I usually intend to scrape every hour during the freezing process, but inevitably end up being busy with other things & forgetting about it.....  No worries, it’s good either way.


Once the citrus was juiced for this particular citrus-flavored granita, I found myself with the peels of the fruit.  They were so very beautiful & I could not bring myself to throw them away.  Luckily, inspiration struck!  So, I recommend saving your citrus peels (I just stuck mine in a ziplock bag & put them in the fridge) for a future use.


Stay tuned for the next post, where I will show you what I did with the citrus peels.


As one final side note, I’m back in ND for almost 2 weeks to photograph a dear friend’s wedding & to see my family.  Brrrr.... it is SO COLD here!  Way, way below zero (especially once the wind chill is factored....).  And I think it is highly ironic that I’ve chosen to post about a frozen dessert when I am freezing in North Dakota, haha.....


CITRUS GRANITA
Makes approximately 4 servings

2 cups of Citrus Juice (I used 1 lemon, 1 lime, 1 minneola tangelo, 1 grapefruit, and 2 cara cara oranges)
1/3 c Granulated sugar, plus additional, to taste.


  1.  Juice all the citrus, either by hand or using a juicer.  Strain out any pits.  (Save the citrus peel in the refrigerator for a future use).  
  2. Whisk in the sugar.  Taste and add additional sugar if the mixture is too tart for your preferences.  
  3. Pour into a shallow baking dish (I used a loaf pan) & place into the freezer.  
  4. Freeze 1 hour, then use a fork to flake the slushy mixture.  Freeze a second hour, then repeat the flaking process.  Freeze until solid to serve (or overnight) & then scrape again just before serving.  If you don’t have time to scrape during the freezing process, isn’t the end of the world.  
  5. Serve immediately!  Store any leftovers in a covered container in the freezer.  


Thursday, February 14, 2013

Flourless Chocolate Cake


Most of the time, I am all for collaboration & sharing.  Perhaps it’s the teacher in me? I want everyone to succeed, especially in the kitchen. And I want to make things as easy as possible for people by sharing things I’ve learned or mistakes I have made.  But every so often, I want to keep things to myself....


I have have a handful of recipes I consider my own “secret” recipes.... Things I kind of consider to be my signature.  Case in point, this chocolate cake. Though I've only made it a couple of times, it's already become one of my favorites.  And I seriously considered keeping my slightly tweaked version of the recipe all to myself....


But since it’s Valentine’s Day, I’m going to share it with you & allow you to add it to your repertoire.  My only request is that you make it for someone you love :)  


It doesn't necessarily have to be a romantic love, but someone who is important to you. Everyone deserves some love (and chocolate), especially on Valentine's Day.


The cake is rather easy to make, but it is very rich (a little goes a LONG way).  The original recipe called for a chocolate glaze on top of the cake.  I find that I prefer if without the glaze, perhaps also because I also prefer to eat the cake warm.  I like to serve it with a scoop of good vanilla ice cream, a slight dusting of powdered sugar & a couple of berries.


Flourless Chocolate Cake
adapted from Whole Foods Market 
Yields one 8” cake or two 4” cakes 

8 oz Bittersweet Chocolate {Use the best quality chocolate you can find} 
6.33 oz Butter
1.20 oz Granulated Sugar
pinch Fine Grain Sea Salt 
4 whole Eggs
2 oz Cocoa Powder


  1. Preheat the oven to 375 F. Liberally coat one 8” springform pan or two 4” springform pans with cooking spray.  Set the prepared pans onto a baking sheet 
  2. Melt together the chocolate & the butter, either in a double boiler on the stove, or by microwaving in 30 second intervals, stirring often.  Cool slightly.  
  3. Whisk together the granulated sugar, sea salt & whole eggs.  Add the slightly cooled chocolate mixture & stir to combine.  
  4. Sift the cocoa powder over the batter & stir to just combined. 
  5. Portion into the prepared pans.  
  6. Bake until the cake increases in volume & the center is just set.  
  7. Cool slightly & serve.  
  8. Store any leftovers, wrapped well, in the refrigerator.  Reheat before serving, if desired.  


Monday, February 11, 2013

Homemade Strawberry Pop "Hearts"


Even with all the gourmet, from-scratch baking I do, I still dearly love pop tarts.  Yes, pop tarts.  


Growing up, we occasionally had pop tarts in our packed lunches, but most often they were the unfrosted version & of the fruit flavor variety.  I always wanted the frosted ones, but alas, that was not meant to be.....  I’m not exactly certain when I developed my particular fondness for frosted brown sugar cinnamon pop tarts, but they are, without question, my favorite.  I especially love them bought from a gas station convenience store on road trips.


And I have a particular ritual for eating the pop tarts.  Even though they come two to a package, I usually resolve to eat only one & save the other for later.  I always fail at that resolution. I turn the tart upside down, so that the frosted side touches my tongue, rather than the unfrosted side.  And I eat from the outsides to the middle, taking bites only from the perimeter, keeping the tart square throughout the process.  


But I have been unable to enjoy my beloved pop tarts, since they are full of wheat, and my body, apparently, has decided it doesn’t like wheat. So, if I want to eat a pop tart, I have to make it myself.  


With Valentine’s Day quickly  approaching, I decided to take a slightly different approach with my homemade tarts.  Instead of squares, I made them heart shaped, essentially making them into pop “hearts” (as my husband called them).  I used a jar of my homemade strawberry jam, slightly thickened, as the filling.  And I decided it was only fitting to garnish the frosted tarts with a smattering of Valentine’s sprinkles.  They’re a bit more flakey & not nearly as sturdy as the commercial version, but they are infinitely tastier!  


Hey, nearly anyone can make their loved ones heart-shaped pancakes for Valentine’s Day, but it takes a whole different level of planning to make your sweetie a homemade pop “hearts.”  With Valentine’s Day only a few days away, you still have time to make these!  If you happen to run out of time, you can still use store-bought jam & pre-made pie crust dough.  Just add some glaze & a few sprinkles--it’ll still be great.


Note: My Laminated Doughs & Breakfast Pastries class use to make these homemade pop tarts in one of their class periods. Sadly, the recipe I have does not list the original source or author, and I no longer remember where I found this great recipe.  My sincerest apologies! 


Homemade Pop Tart Hearts (aka “Pop Hearts”) 
Yield: approximately 10 pastries 


Pastry Dough
8.5 oz AP Flour (or I substituted my favorite AP Gluten Free Flour Mix)
1 Tbl  Granulated Sugar
1 tsp  Fine Grain Sea Salt
8 oz   Unsalted Butter, cold, cut into cubes
1 whole Egg
1 oz  Milk

  1.  Combine the flour, sugar, and salt in a bowl.  Sprinkle the cold cubes of butter over the dough.  Use a pastry cutter to cut the butter into the dry ingredients until it resembles coarse meal.  
  2. Whisk together the egg & milk and drizzle into the bowl.  Mix until just combined.  
  3. Divide the dough into two pieces, flatten into discs, wrap & refrigerate overnight (if you can) or if you’re pressed for time, at least 1 hour.  


Jam Filling
Note: if using store-bought jam, reduce the cornstarch & water by half.  And feel free to use whatever Jam you like.  I used Strawberry.  

8 oz  Homemade Jam
1 Tbl Cornstarch
1 Tbl Cold Water
Splash of Vanilla Extract

  1.  In a heavy bottom sauce pan, heat the jam over medium heat. 
  2. Make a slurry with the corn starch and water, mixing until there are no lumps {I use my fingers to ensure no hiding lumps} 
  3. Whisk the slurry into the heated jam.  Bring the mixture to a boil, stirring constantly.  Boil for 2 minutes.  
  4. Remove from the heat to cool completely before assembling the tarts


Assembly
Note: In a pinch, these assembly instructions can be used with store bought pie-dough & jam..... 

1 batch of Pastry
additional flour for dusting.
1 batch of jam filling
1 egg, beaten
Glaze, optional
Sprinkles, optional

  1. Line two rimmed baking sheets with parchment paper.  
  2. On a well-floured surface, roll the pastry dough out until it is roughly 1/8” thick.  Cut as many heart shapes out of the dough as possible.  The dough may be re-rolled once to make additional shapes.  
  3. Lightly paint the edges of half of the hearts (the bottom pieces) with the beaten egg.  The egg will help as “glue” to help the top and bottom pieces stick together.  
  4. Place a generous tablespoon of filling in the center of the tart.  Spread it out, just slightly, making sure to keep the edges free from filling.  Top with a second heart & gently press around the edges to adhere. Press with a fork around the edges to ensure a good seal.  
  5. Transfer the heart to the baking pan. Use a knife to gently pierce the heart a couple of times to allow the steam to escape during the baking process. Repeat with the remaining heart shapes.  
  6. Chill the hearts, uncovered, in the refrigerator for 20 minutes. Preheat the oven to 350 F. 
  7. Bake the pastries for 20 to 25 minutes until they are just barely golden.  If you intend to “toast” the tarts later, make especially sure they are initially baked very light.  
  8. Remove from the oven and cool slightly.  Optional: garnish by drizzling or dipping the tops in glaze (recipe follows) and adding a few festive sprinkles.  


Glaze
Note: Confession time!  I never measure when I make glaze.... I just whisk Confectioners sugar with a little milk & vanilla.  But here is a guideline recipe, in case you need some guidelines.  
1 c Confectioners Sugar
2 Tbl Milk
splash Vanilla Extract
  1.  Whisk the confectioners sugar with the milk until it forms a spreadable consistency.  
  2. Use immediately, or keep completely covered until ready to use.   


Tuesday, February 5, 2013

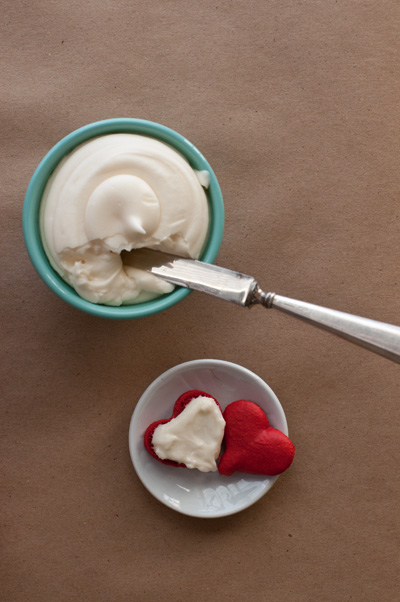
Heart Shaped Red Velvet Macarons with Cream Cheese Filling


With February upon us, and the Super Bowl over, I think it is safe to bring out the Valentine’s-themed desserts.  Thought I really don’t discriminate against any holidays, Valentine’s Day does rank near the top of my favorite’s list.


What’s not to love about a holiday nearly dedicated to sweets and to telling your family & friends how much you love them? So consider yourselves warned that several Valentine’s themed posts may loom on the horizon :)


I spent several days last month making, decorating, styling & photographing fun Valentine’s treats, with the hope of selling some of them for Small Batch: Pastry & Preserves. However, some unexpected things have popped up, making the second half of February and beginning of March EXTREMELY busy, and unfortunately, my work with Small Batch: Pastry & Preserves may have to take a brief hiatus.


Lucky for you, dear readers, this hiatus means that I’m going to share the recipe for these heart-shaped red velvet macarons with you! I simply adapted my favorite vanilla macaron recipe, adding a hint of cocoa & a good amount of red gel coloring, to turn it into a red velvet macaron.  Since red velvet cake is classically paired with cream cheese icing, I added cream cheese filling to the macarons.


As if macarons themselves aren’t finicky enough, I decided to pipe the super red batter in heart shapes.  This heart shaped piping does take some practice & I do recommend printing out a heart template to place underneath your parchment paper. I piped one half of the heart & then the second half so that they met in the middle at the bottom point.  My husband came home from work as they were going through the drying process, and the first words out of his mouth were, “Ooooo! Butt shaped macarons!”


I simultaneously burst in the laughter & face palmed.  And then, of course, I had to instagram the entire thing .  Thankfully, once they were baked, they looked more “normal.”


NOTES: 

  • Macarons do take practice, so if you've never made them before and want to make them for someone special for Valentine's Day, I'd suggest at least one practice session before hand.  Any less-than-perfect macarons are wonderful when broken up and added to an ice cream sundae!  
  • I used Americolor 4.5 Oz Super Red Soft Gel Paste, along with Hershey's Special Dark Cocoa Can-8 oz to achieve the Red Velvet color and flavor. 
  • To make my heart-shaped template for underneath the parchment paper, I used the heart character from the font "Zapf Dingbats," enlarged it to my preferred size (120 pt), and repeated it throughout an entire piece of paper.  Then I printed a few copies of the page & slid it underneath the parchment before piping.  Alternately, you could trace hearts, but I think the printing is easier!  Just don't forget to slide the printed pages back out after the piping is done.  
  • I do not recommend dipping your finger in water and smoothing out imperfections on the macaron shells.  I tried it on a few, but it only caused the surface to have funny bubbles once baked.  

RED VELVET MACARON SHELLS
makes approximately 70 hearts (if you use my template instructions above) which equates to 35 sandwiches.  

81g     Almond Flour
108g   Confectioners Sugar
1 tsp    Hershey's Special Dark Cocoa Powder
63 g    Egg Whites, at room temp 
1.5 g   Meringue Powder
pinch  Sea Salt
36 g    Granulated Sugar
Red gel food color, as needed  

  1. Prepare 2 sheet pans by lining them with parchment paper.  Slide the heart shaped template underneath the parchment, if planning to pipe heart shapes.  Fit a pastry bag with a large round tip {I used an Ateco 804} 
  2. In the bowl of a food processor, pulse the almond flour, confectioners sugar and cocoa.  Once processed, sift the mixture and remove any large pieces.  
  3. Whip the egg whites on medium speed. in the very clean bowl of an electric mixer fitted with the whisk attachment.  Stir together the granulated sugar, sea salt, and meringue powder. Once the whites are foamy, gradually add the granulated sugar mixture.  Increase the mixer speed to high.  Continue whipping until the mixture forms medium peaks.  
  4. Begin adding the red gel food color, while mixing at medium speed.  Add enough to make the batter very red.  Once your desired color level has been reached, increase the mixer back up to high & mix until the meringue forms stiff peaks.  
  5. Fold the dry ingredients into the meringue until everything is completely combined into a shiny mass & the mixture forms ribbons that will dissipate.  Remember, you can always add more folds later, but you cannot take them back!  
  6. Test the mixture by piping a test shape.  If the piped shape holds a peak (like a hershey's kiss) that will not dissipate after you bang the sheet pan on the counter, the mixture needs a little more folding before the rest of the shells are piping.  When the mixture reaches the proper consistency, pipe the heart shapes. 
  7. Bang the pans of piped macarons on the counter, then allow the shells to dry for 30 to 60 minutes, depending on the humidity, to allow them to develop a skin over the surface.  
  8. Preheat the oven to 350 F.  Once the macarons have developed their skin, slide the pans into the preheated oven.  Immediately reduce the oven temperature to 300 F. Bake for 10 minutes, then rotate the pans & bake for another 8 to 10 minutes (or until the macarons can nearly be peeled from the pan). The residual heat from the pan will finish the baking process once the macarons are removed from the oven.  
  9. Allow the shells to cool completely before filling. 
  10. While the filled macarons can sit at room temperature, I recommend refrigerating them, if they are not going to be consumed that day.  Allow them to come back up to room temperature before eating.  
CREAM CHEESE FILLING
note, this will make more filling than you need, but the leftovers can be refrigerated or frozen for a future use.  

4 oz Cream Cheese, at room temperature
2 oz Unsalted Butter, at room temperature
8 oz Confectioners Sugar, sifted
1.5 tsp Vanilla Extract

  1. 1.  In the bowl of an electric mixer fitted with the paddle attachment, cream together the cheese and the butter until the ingredients are well combined.  Add the confectioners sugar & vanilla & beat until combined.  
  2. To fill the macarons, either spread a little of the filling on the bottom of the macaron or pipe a little bit.  Top with the second macaron.  
  3. Store any leftovers in the refrigerator.