Tuesday, December 24, 2013

White Hot Cocoa Peppermint Affogato (GF)

White Hot Cocoa Peppermint Affogato (GF)

Merry Christmas Eve! I accidentally left my camera on while we were out of town for a few days & I didn’t discover the dead battery until I was ready to shoot this post.  So, iPhone images it is :)

White Hot Cocoa Peppermint Affogato (GF)

This year’s Christmas will be rather low-key, just my husband and myself. We’re looking forward to cooking Christmas brunch and Christmas dinner together while watching some festive movies and developing some of our own Christmas traditions. I am currently voting for the “stay in your pjs most of the day” tradition. :)

White Hot Cocoa Peppermint Affogato (GF)

My family always has hot cocoa on Christmas Eve or Christmas day--it’s a tradition that stems from my maternal grandma’s childhood and involves a very special antique hot cocoa set.  I’m a little sad to miss out on the family hot cocoa session, so I’m planning to incorporate something similar into our Christmas Eve festivities. We’re going to have our hot cocoa affogato style instead.  

White Hot Cocoa Peppermint Affogato (GF)

Affogato is an Italian-based dessert where a shot of hot espresso (or very strong coffee) is poured over a cold scoop of ice cream.  The heat melts the ice cream & espresso and ice cream become self-saucing. Sometimes liqueurs are also added.  Vanilla ice cream is most classic, but really any kind could be used.

White Hot Cocoa Peppermint Affogato (GF)

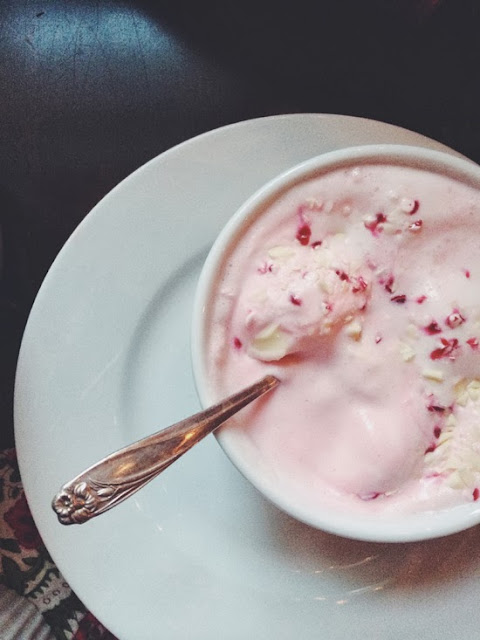
For my version, I substituted a white hot chocolate for the espresso & candy cane ice cream for the vanilla ice cream.  Store bought ice cream works perfectly (which is a good thing because our freezer is so full that my ice cream maker bowl would never fit), but the white hot cocoa needs to be homemade. Luckily, it’s super simple.  Good quality white chocoalte is a must--always make sure the chocolate bar ingredients include cocoa butter & real vanilla.  I used a bar of Lindt chocolate I found in the candy bar aisle of the grocery store. I like to garnish with an extra sprinkle of crushed candy cane pieces & a little chopped white chocolate, but those are totally optional garnishes.

White Hot Cocoa Peppermint Affogato (GF)

Serving the affogato with a crunchy festive cookie on the side completes the dessert (feel free to dunk away). Voila, an easy dessert that also fulfills the Christmas cocoa tradition.

White Hot Cocoa Peppermint Affogato (GF)

I wish you all the merriest of holidays. I hope you are able to spend it with loved ones. And if you’re still stressing over an easy holiday dessert, consider the affogato.  It’s easily made for two or for 12.  And it’s gluten free!

White Hot Cocoa Peppermint Affogato (GF)

White Hot Cocoa Peppermint Affogato 

2 c Milk (I used whole milk)
4 oz Good quality white chocolate (I used Lindt)
1 tsp Vanilla Extract
{optional} splash Vanilla Bean Paste 

Candy Cane Ice Cream (store bought is fine) 
crushed candy canes, for garnish
chopped white chocolate, for garnish

  1. In a small sauce pan, heat the milk to a simmer. 
  2. Chop the white chocolate into small pieces. Whisk into the simmering milk and continue stirring until all the chocolate is melted. Do not allow to boil. Remove from the heat and whisk in the vanilla(s). Pour the white hot cocoa into a vessel with a spout, such as a liquid measuring cup or a french press. 
  3. In a mug or bowl, add a couple scoops of candy cane ice cream. Pour the prepared white hot cocoa over the ice cream. Garnish with a sprinkle of crushed candy canes and white chocolate. Serve immediately.  
White Chocolate Mocha variation:

  • When simmering the milk for the hot cocoa, add a little instant espresso powder for a mocha kick.   
If you can’t find candy cane ice cream:

  • Substitute vanilla ice cream & make the white hot cocoa peppermint/candy cane flavored instead.  Add a few drops of peppermint extract (a little goes a long way) to the finished white hot cocoa.  Or, melt some candy cane pieces into the simmering milk before adding the white chocolate. 
This post contains affiliate links, meaning Sweet Treats makes a small commission off items purchased 
after an Amazon link is clicked with no additional cost to you. Thanks for your support.

Saturday, December 21, 2013

Cranberry Orange Jam & GF Baked Brie


Giving gifts is something I love to do, especially during the Christmas season. While I’m not opposed to buying gifts, there’s something extra special about handmaking things.


Jam (or other preserves) is always one of my go-to gift ideas because 1) it is easy to make multiple jars at a time, and 2) the jam has a shelf life of a year (or more) if processed correctly so that the lids seal, and thus the recipient can wait to open the jar, if they so desire.


This year, I’ve made a couple batches of Cranberry Orange Jam with Pecans that I’ll be giving to many of my family members and friends.  Sorry, family and friends, for the spoiler alert!  I made a version of this jam (minus the orange component) last year, but all the jars in my single batch sold out almost instantly! I didn’t even have enough left to give any as gifts.  So, this year’s remedy was to make more than one batch & not to sell any at all :)


A couple jars didn’t seal properly during the waterbath processing stage, so instead I had to refrigerate them & we’ve been enjoying them instead, not that that’s been too difficult a task!  I love eating jam on toast or english muffins or croissants, etc. but I sometimes forget that not everyone is as in to baked goods as I am.  Some people don’t know what exactly to do with a jar of jam because they have a hard time thinking outside the toast and/or pb&j box.  


One of the beauties of this particular jam is how versatile it is.  On the sweeter side, jam could be stirred into plain yogurt to create your own custom flavor, or even in to oatmeal. it could be sandwiched between two butter cookies. Warm jam could be spooned over ice cream... or pancakes... or waffles! .  Really, the possibilities are endless.


This jam is sweet, but it wonderfully compliments savory ingredients as well.  It could be served with turkey or pork. It would make a great condiment on a sandwich. And don't even get me started on paring it with cheese!


Case in point, baked brie.  Often baked brie is wrapped in puffed pastry before it is baked, but for this much more simple (and naturally gluten free) option, I simply topped a round of triple creme goat brie with a few spoonfuls of jam before baking it to oozy cheesy perfection.  The finished brie was served with some gluten free crackers, though honestly, it was difficult to not just eat the jammy cheese with a spoon!


So, if you’re still searching for gift options, consider making a batch of preserves of some sort.  And, tying a small Cinnamon Applesauce Ornament is a great way to dress up any jars for gift giving.


Cranberry Orange Jam with Pecans 
Adapted from Kraft Recipes
yields 6 half pint jars, plus a little extra for the fridge

1 12 oz bag of fresh cranberries
1 c (8 fl oz) Orange Juice, 
1/2 c (4 fl oz) Water
zest of half an orange
45.5 oz (6 1/2 c) Granulated Sugar 
1 c Chopped Pecans
1 pouch Certo liquid pectin 

  1. Fill a large stock pot with water & bring to a simmer.  Add a splash of white vinegar to the water if the water is hard. Wash 6 half pint jars, along with rings and new lids. Let stand in hot water until ready to use. 
  2. In a second large stock pot, bring the cranberries, orange juice and water to a boil over high heat. Reduce the heat to low, cover and simmer for 10 minutes. 
  3. Infuse the sugar with the orange zest.  Add the infused sugar and nuts to the prepared heat. Increase the heat to high heat and bring to a rolling boil, stirring constantly. Remove the pot from the heat. Stir in the pectin, return to the stove & boil for exactly 1 minute, stirring constantly. 
  4. Remove the pot from the heat and skim off any foam that may have developed.  Increase the heat under the first water-filled stock pot to high. 
  5. Portion the jam into prepared jars, leaving 1/8” headroom. Run a knife around the edges of the jam to remove any potential air pockets. Add a little additional jam to the jar, if necessary. Wipe the rim & threads of the jars. Cover with the lids& screw on the rings until they are finger tight. 
  6. Lower the jars into the boiling water & cover the pot. Process the jars for 10 minutes. Remove the pot from the heat, and let stand for 5 minutes before removing the jars.  Let the jars cool completely. If after cooling any jars have not sealed, store those in the refrigerator. The sealed jars will keep at room temperature for 1 year.
Note: If you’re completely new to canning, Food In Jars has some great resources!  


Gluten Free Baked Brie with Cranberry Orange Jam 
adapted from The Kitchn 

1 round of brie cheese--I used a triple creme goat brie that was 6.5 oz in size
Cranberry Orange Pecan Jam 
Additional Pecans (optional)
Fresh herbs to garnish--I used Rosemary 
Crackers for serving-- I used ones like these.
  1.  Preheat the oven to 425 F. 
  2. Cut off the top of the brie & scoop out a bit of the center. 
  3. Place the cheese onto a piece of parchment paper and onto a baking dish. 
  4. Top the cheese with several spoonfuls of jam & extra pecans, if desired. Place into the oven.
  5. Bake for 8 to 10 minutes, or until the cheese is softened, but has not completely collapsed.  
  6. Remove from the oven & use the parchment paper to lift the cheese onto a serving platter. Garnish with a sprig of herbs & serve with crackers. 


Sunday, December 15, 2013

Cinnamon Applesauce Ornaments


This holiday season, I’m trying to keep many things homemade, or home crafted.  Some in the spirit of frugality, and other simply because I like to challenge myself to use things already on hand. 


In past years, we’ve been back visiting family on actual Christmas Eve/Day, so I have been content with a tiny artificial christmas tree & minimal decorations.  But this year, we will be staying here in Texas, and thus a mini tree simply would not do!  I grew up with real Christmas trees, but my husband’s family always had artificial trees, so it took some convincing to persuade him we should get a real tree this year.


I don’t mind artificial trees, I just know that we don’t really have space to store one during the off season & also a decent artificial tree costs a good chunk of change!  And there is something so, almost magical about going and picking out your own tree each year. 


After buying the actual tree, plus the tree stand and lights, I knew that I wanted to be a bit more creative with the remaining decorations (we only had mini ornaments & a tiny string of lights for our aforementioned tiny tree of the past). Instead of a tree skirt, I used a big piece of burlap I already had. I crocheted a simple garland for the tree out of some leftover white homespun yarn. We added some old snowflake ornaments that I at one time intended to tape on windows, as well as some candy canes. And finally, I made some Cinnamon Applesauce Ornaments from a recipe I pinned last year.


I have a vague childhood memory of one of my sisters making something similar to these ornaments either in grade school or Sunday School.  But I really do not remember.... What does stick in my mind is how fragrant these type of ornaments are!  Isn’t it amazing how much of a memory trigger smells can be?  Cinnamon, along with evergreen, bayberry, cranberry & peppermint, really is one of those smells that transports me to Christmas time.


With only three ingredients, cinnamon, applesauce & ground cloves, the ornament dough is easy to make, though I will say that I’ve never measured out quite this much cinnamon for only one recipe before! The dough rolls out just like cookie dough (only cinnamon is used for dusting, not flour) and can be cut into whatever shapes desired. The dough does not spread at all, so the shape will stay true to whatever cookie cutter chosen.  And seriously, the smell while the ornaments are baking is quite fantastic.


Once baked until hard, the ornaments just need a hanger & they are ready to use. I, of course, am rather partial to baker's twine, but really any sort of string or wire would work.  It is best, though, to determine what kind of hanger will be used before the ornaments are baked (that way the opening for the hanger can be made into the appropriate size).


I did really intend to post this recipe earlier, but my computer hard drive had to be unexpectedly replaced this week and restoring my system ended up being a more complicated process than I originally anticipated.  Thankfully, with the help of the Genius Bar employees & Apple’s phone support, my computer is completely restored & running smoothly! Even if the tree decorating is already done for this season, these ornaments would also make lovely additions to embellish wrapped packages or hostess gifts. Or, remember this craft for next year :)


Cinnamon Applesauce Ornaments
Adapted from Katy Elliott 
Note, since these ornaments aren’t actually eaten, I went for the cheapest ingredients I could find--this is not the time for fancy applesauce or spices! 

1 cup (244 g) Applesauce
1 1/2 c Cinnamon (divided into 1c and 1/2 c) 
2 Tbl ground cloves
additional cinnamon for sprinkling

  1. Preheat the oven to 225 F. Line a couple baking sheets with parchment paper or a Silpat. 
  2. In a bowl, stir together the apple sauce with 1 cup of the cinnamon.  Keep mixing, switching to using your hands if it is easier, until a wet dough is formed. 
  3. Sprinkle over the additional 1/2 c of cinnamon and the cloves.  Knead, with your hands, in the bowl until everything is the same consistency.  Be aggressive--you don’t want wet spots & dry spots.  If the dough remains super sticky, add a little extra cinnamon.  If the dough is excessively dry, add a spoonful of applesauce. Note: I didn’t have to add any additional cinnamon or applesauce.
  4. Sprinkle a clean board or counter with a little cinnamon (like you would flour for rolling out cookie dough). Use a rolling pin to roll the dough to between 1/4” and 1/8” and use cookie cutters to cut out your desired shapes.  Place the cutouts onto the parchment lined baking sheets.  Gather up the scraps, knead them well & repeat the rolling process until all the dough is used up.  Use a skewer/toothpick/small dowel to poke a hole where string (or another hanger) can be added after the baking process.
  5. Bake the ornaments at 225 F for 1 hour, though check to make sure they are not developing any browning on the edges.  Flip the ornaments over (they may have warped slightly) and bake for an additional 30 minutes.  Turn off the oven, flip the ornaments again & allow them to cool completely in the oven. They should be rock hard once done.  More baking time may be required for more humid climates.  
  6. Once cool, add a loop of string (I, of course, am partial to bakers’ twine) and hang them on the Christmas tree, or use them to decorate packages.
note: this post may contain affiliate links. 

Monday, December 9, 2013

Gingerbread Pound Cake (GF)


How did it get to be December 9th already?!? I’m a bit behind on holiday prep this year, but maybe this gingerbread pound cake will help me get into holiday overdrive.  


Most gingerbread recipes produce cake that is fairly light and delicate, but in this case, I wanted a sturdier cake while still retaining the warm spice & molasses flavor of a traditional gingerbread.


And a loaf-shaped cake somehow feels a bit more relaxed, not to mention eating it on the go is easier (though perhaps that isn’t so much a good thing to mindlessly be eating cake while doing other things).


I’m sure it would be great with a glaze or an icing, but in the spirit of trying to keep things a bit lighter during the holiday season when indulging is inevitable, I decided to forgo any glaze.  It was just the right amount of sweet without any extras.


We enjoyed eating cold slices of the cake just on their own accompanied by piping hot cups of Holiday Tea. But to dress it up a bit for a dinner party with friends, I added a scoop of eggnog ice cream & a drizzle of orange sauce (from this post) --absolutely delicious!


Gingerbread Pound Cake (GF) 
adapted from Channeling Contessa via The Every Girl
Yields one 9x5 inch loaf

8.5 oz / 2c Jeanne’s Gluten Free AP Flour Mix (or substitute cake/AP flour if not GF)
1 tbl Ground Ginger
2 tsp Cinnamon
1/2 tsp Cloves
1/2 tsp Nutmeg
1/2 tsp Cardamom 
1 tsp Baking Powder
3/4 tsp Salt
6 oz / 12 tbl (1.5 sticks) Unsalted Butter, softened
8 oz / 1 brick Cream Cheese, softened
3.5 oz / 1/2 c Granulated Sugar
5.6 oz / 3/4 c packed dark brown sugar
4 oz / 1/3 c Molasses
4 eggs, room temperature
2 tsp Vanilla Extract
  1. Preheat the oven to 325 F.  Grease a 9x5 loaf pan with pan spray (or additional softened butter).  Line with parchment and grease the parchment too. 
  2. In a medium mixing bowl, add the flour, spices, baking powder, and salt. Whisk to combine. Set aside.
  3. Place the softened butter & cream cheese into the bowl of an electric mixer fitted with the paddle attachment. Cream on medium speed until smooth & completely combined. Scrape down the sides.
  4. Add the sugars & continue mixing on medium speed until light and fluffy.  Add the molasses & beat until smooth.  Scrape down the sides.  
  5. Add the eggs, one at a time, as well as the vanilla, & mix until completely combined. 
  6. On low speed, stir in the dry ingredients.  Mix until just combined. Remove the bowl from the mixer & use a spatula to finish mixing by hand.  
  7. Pour the batter into the prepared pan & place into the preheated oven. Bake for 1 hr and 25 minutes (or until a toothpick inserted into the center of the cake comes out clean). 
  8. Cool for 30 minutes in the pan, then remove from the pan.  
  9. Allow to cool completely before slicing. Store any leftovers, well wrapped, at room temperature or in the refrigerator. Loaf may also be frozen for longevity. 

Note: this post may contain affiliate links. 

Tuesday, November 26, 2013

Cinnamon Chip Scones (GF)


No matter whether it was Thanksgiving, Christmas or Easter, I grew up with the tradition of having a special holiday breakfast.  My mom would make an egg casserole (which we called “egg bake” in the upper midwest) and cinnamon rolls, and there would also be fruit & juice. Mom would set the table with a festive tablecloth, the crystal juice glasses that otherwise lived in the china cabinet, sometimes the fine china, but always with holiday napkins. After my dad said the blessing, we would clink glasses, toast to whatever holiday it happened to be, and then, of course, eat!


With my insatiable sweet tooth, my personal favorite part was the Pillsbury cinnamon rolls that Mom would bake in a round cake pan. As most siblings do, my sisters and I would all try to vie for the middle roll which usually had the most frosting. I still have a particular fondness, even to this day, for freshly baked Pillsbury cinnamon rolls.


As a somewhat newly married couple, my husband and I are still developing our own traditions. One of the the traditions I’m trying to pass into our “micro-family” is the holiday breakfast concept. Of course there are a few adaptations my husband and I like to make (coffee is a must and sometimes we mix a little bubbly with the juice), but I still dearly wish to include my beloved cinnamon rolls.  Once I started living mostly gluten free, though, suddenly the options changed.  There are very few gluten free options in our small-ish town, unless you want to make things yourself.


I’ve done a fair amount of gluten free baking & cooking these days, but yeasted products still are a bit of a mystery to me. I’m well versed in how bread flour works in artisan breads & I just haven’t mastered how to mimic those items in gluten free versions. Last weekend, I attempted to adapt a cinnamon roll recipe to be gluten free, but the results were not good. The texture was all off & so was the flavor.... I guess it may take a lot more testing before I am confident in adapted gluten filled yeast products to be gluten free.


Luckily, scones ARE easily adapted to be gluten free.  This particular cinnamon chip variation tastes surprisingly a lot like my favorite pillsbury cinnamon rolls.  I added a bit of leftover pumpkin puree to the dough.  Rather than tasting “pumpkin-y,” the puree just adds a bit of extra moisture & helps deepen the complexity of the flavors.  Once the glaze is added they became a perfect substitution--in fact, I couldn’t stop eating my test batch! I had to put the leftovers in the freezer to curb myself.  Since scones fit in the non-yeasted “quickbread” category of baking, they don’t require rising time! I love recipes that save time during busy holidays. These scones absolutely will be making an appearance on this year’s Thanksgiving brunch table.


I hope that wherever you are this Thanksgiving and holiday season, you are able to spend time laughing and giving thanks with friends & family, and that you take time to make & eat good food. Perhaps you can start your own holiday breakfast tradition.


Cinnamon Chip Scones (GF) 
yields 12 to 16 scones, depending on the size

Scones
4 oz / 1 stick Unsalted butter, cold
2/3 c Whole Milk + 1 tsp Lemon Juice (or substitute Buttermilk )
8.5 oz / 2 c Jeanne’s Gluten Free AP Flour Mix (or substitute regular AP flour, if not gluten free) {LINK} 
1.85 oz / 1/4 c Brown Sugar
1/2 tsp Baking Soda
2 tsp Baking Powder
1/2 tsp Salt
1 tsp Cinnamon
120 g / 1/2 c Cinnamon Chips
122 g / 1/2 c Pumpkin Puree 
Tapioca Starch, for dusting

Glaze
Confectioners’ Sugar
Milk 

  1. Grate the cold butter, using the large grate part of a box grater, onto a piece of plastic wrap or parchment paper. Place the grated butter into the freezer while measuring & preparing the remaining ingredients. If not using buttermilk, mix the whole milk with the lemon juice & let stand at room temp. 
  2. Measure the remaining ingredients. Preheat the oven to 400 F. Line 2 baking sheets with parchment paper & set aside. 
  3. In a large bowl, whisk together the flour, sugar, soda, powder, salt & cinnamon.  Add the frozen butter pieces & toss quickly with your hands to combine.  Break up any large clumps.  Add the cinnamon chips & briefly toss to combine. 
  4. In a liquid measuring cup, whisk together the buttermilk with the pumpkin puree. Add the liquid to the dry ingredients & quickly mix with your hands until the dry ingredients are just incorporated. Be careful not to overwork the dough or let the heat from your hands melt all the butter.  
  5. Dust the clean counter or board with additional tapioca starch (or AP flour, if not gluten free).  Pat the dough out, adding tapioca starch on top of the dough & onto your hands, until the dough is approximately an inch tall.  Use a small round cutter (or any shape you like) to cut out scones.  Place the cut scones onto the prepared baking sheets. Carefully gather the scraps & re-pat them out, repeating the process until the dough is all used.  (Note: re-rolling works well with the gluten free dough, but if regular flour is used, the re-rolled scones may be a bit tougher.) Alternately, you can use a large cookie scoop to make drop scones by scooping the scone dough out of the bowl & portioning it directly onto the sheet pan. 
  6. Use a try pastry brush to brush off any excess tapioca starch.  Bake both pans in the preheated oven for 15 minutes, rotating the pans & swapping the top and bottom pans halfway through.  The scones are done when they are lightly brown & the cinnamon chips begin to caramelize.  
  7. Remove the pans from the oven & allow to cool slightly while the glaze is made.    
  8. In a separate bowl, sift a little confectioners’ sugar to remove any lumps. Add a splash of milk & whisk until combined. Adjust the amount of milk & confectioners sugar until you achieve a thick glaze. Either stripe the glaze across the slightly warm scones, using either a cornet paper piping bag, a zip-top bag with a corner cut off, or a pastry bag.  Alternately, dip the slightly warm scones into the glaze.  Allow the glaze to set & serve. 
  9. Store any leftover scones at room temperature in a covered container for up to 2 days, or freeze for longer.  

Note: As far as cinnamon chips go, I usually use Hershey’s brand.  However, they can be a bit difficult to find sometimes...   In some areas, like I discovered in South Carolina, they are only available during the holiday season, so I recommend stocking up.  Or, King Arthur has they available to order from their website (as does Amazon. ).  

This post contains affiliate links.

Friday, November 22, 2013

Pecan Pie (GF)


Sometimes, we do not fully realize a person’s influence on us until they are no longer with us. Case in point, my friend Chef John Michael Lerma, who sadly, at the age of 52, passed away earlier this month.


John Michael, or JML as he is often referred to, was a native of my home state of North Dakota & also attended my alma mater, the University of North Dakota, though in the past years, he resided in the Twin Cities area of Minnesota.  In addition to being a noted food writer, cookbook author, and competitor in culinary competitions, he also taught in various demonstration kitchens, was a representative for Emile Henry bakeware, and he lead culinary vacations (!!) to both Italy & Mexico.


While I was working at the University of North Dakota Wellness Center, both in the marketing department and as an instructor for the Culinary Corner Demo Kitchen, John Michael did several guest demonstrations. He also cooked for us demo kitchen employees a few times & just talked to us about life and experiences.  He had such a big heart & truly loved food (and people). I was so saddened to hear of his passing.


When I met John Michael, I was in an interesting place in life... I knew I would be moving to South Carolina the following year to fulfill my dream of attending culinary school, but I didn’t really know what life would bring beyond that. Having also earned an art degree in graphic design/photography and also having worked in a marketing department, I really appreciated an atmosphere of collaboration & helping your fellow artists become the best they could be. But it seemed to me as though kitchens were often more competitive than collaborative. John Michael really embodied the spirit of collaboration I found was lacking in many kitchens. It was easy to tell from conversations with him one-on-one and from seeing him teach a room full of eager pie fans how excited he was about sharing his knowledge with others. He genuinely cared about his audience & wanted them to be as successful as possible in their kitchen endeavors. He was genuine, not at all afraid to reveal his own tricks & tips.


John Michael was famous for many food items (I still love to make his pizza dough & this amazing creamed mushroom dish I saw him demo once), but pies were one of his specialties.  He won seven (!) national pie competitions & his second cookbook is entirely pie themed.  I thought the best tribute to him was to make a pie in his memory. And to make that pie in the pink Emile Henry pie dish he graciously gave to me (and autographed) on one of his visits.  With Thanksgiving around the corner, making his pecan pie recipe, adapted to be gluten free, seemed the most appropriate.


In preparation to make this pie & write this post, I reflected on my experiences with John Michael Lerma. I like to think that perhaps his genuine, caring manner has influenced my own style, both when I was teaching in a culinary classroom, and now as I “teach” through blogging. I hope that I can portray even a fraction of his passion for food & for others. I will also forever remember him as the person who introduced me to the wonderful world of Vanilla Bean Paste(which truly is one of my favorite baking ingredients).


John Michael, you will be missed!  But your legacy will live on in your cookbooks & in the many lives you touched!

Pecan Pie (GF) 
adapted from Garden County Pie
yields 8 servings 

1 recipe GF Pate Brisee 
tapioca starch for dusting 

FILLING
4 large eggs, room temperature, well beaten
5.25 oz / 3/4 c Granulated Sugar
2.65 / 1/3 c melted unsalted butter
3.65 oz / 1/3 c pure maple syrup (NOT pancake syrup)
5.5 oz / 1/2 c light corn syrup
5.5 oz / 1/2 c dark corn syrup )i only had 4 oz, so i added an additional 1.5 oz of light) 
2 tsp vanilla bean paste
1 tsp Bourbon (optional) 
1/4 tsp sea salt
1 1/2 c pecans, broken, plus additional for decorating the top of the pie (for me it was 3.9 oz +2 oz inside) 

Whipped Cream for serving, optional 
  1. Make the pie dough & allow it to rest in the refrigerator at least 2 hours (overnight is even better. 
  2. When ready to assemble the pie, remove the dough from the refrigerator & place it on a surface that has been well dusted with tapioca starch. Dust the top of the dough & the rolling pin with additional tapioca starch.  
  3. Quickly roll out the dough, keeping it as circular as possible, until it is a little larger than a 9” pie pan.  Move the dough around on the counter/board to make sure it isn’t sticking.  
  4. Gently fold the dough in half & place it into the center of the pie pan.  Unfold the dough & press it lightly with your finger tips & knuckles until it is formed to the pan.  Use a knife or kitchen sheers to cut off any excess.  Place the pan into the refrigerator while the rest of the filling is made.
  5. Preheat the oven to 375 F. 
  6. In a large bowl, whisk together the eggs, granulated sugar, melted butter, pure maple syrup, corn syrups, vanilla bean paste, bourbon and sea salt. Add the pecans & stir to combine.
  7. Remove the prepared crust from the refrigerator & set on top of a rimmed sheet pan. Optional, use the edges of a spoon to make the scalloped pattern by gently rolling the tip of the spoon (I used an ice tea spoon) over the edge of the dough. Add a divot inside each scallop.  
  8. Pour the prepared filling into the crust.  Place additional pecan halves around the edge of the pie, if desired.
  9. Bake for 20 minutes at 375 F, then reduce the oven to 350 and bake for an additional 40 to 50 minutes.  Check the pie often in the end stages & cover the edges of the pie with foil if they become too dark.  When the pie is done, the edges should be set & the center will be just a little wobbly.
  10. Remove the pie from the oven & allow to cool completely. Refrigerate, if possible, a couple hours before serving--this will make cutting the pie easier. 
  11. Cut into pieces & serve with whipped cream, if desired. The crust will be very crumbly, but delicious. Leftovers can be stored room temperature in a covered container, but the pie is easier to cut and serve when refrigerated. 
This post contains affiliate links.